Showing posts with label techniques: embroidered house portraits. Show all posts

Thursday, August 4, 2011

Matt's House...Stitching Finished

This sample for my "Home Portraits" classes at the Victorian Stitchery Retreat in Wichita, Kansas next November is all stitched up now.  I've decided not to actually finish the piece until after class, so students can see the back.  (Don't you always want to see the back of a stitching project?  I do.)

My brother has lived in this little bungalow for 20 years now and I always love going to see him there.  Working on his home portrait was almost like a visit...

I'll start with some detail shots and then show the whole thing.

More and more, I love including writing on my quilts.

A tiny bit of silver thread brings those windchimes to life, doesn't it?

I wanted to create a foreground to put the house "in context".  I used cut out printed fabric flowers, some vintage appliques, and a few vintage millinery leaves.  It was a fun compositional problem, and quite simple to execute, as it was all done by machine.....

...and I had to sign it.

The whole piece is 12" X 14".

What a great porch that is...and the roses in their pots are so welcoming...

There are actually a lot of design issues that I tried to build into this sample for the purpose of class discussion.  I am so looking forward to working with my students as they create their own "home portraits"!

Wednesday, July 27, 2011

Matt's House...Progress

Thank you, everyone, for your support and condolences regarding my missing quilt.  I really appreciate it!

While I was at Michillinda I got a fair amount of stitching done on the home portrait of my brother's house. It sure was nice, stitching away on the porch...

Here is an overall shot.  The print is about 8" X 10".
I still have the flowers in the foreground to stitch...and the borders around the piece of course to do.  But most of the work on the image is done.

Some details....

I have to use fine thread to try and keep in scale with the image.  The #12 perle variegated cotton used in the agapantha leaves seemed downright huge!

It was fun covering that latticed area....

The next week is going to be busy with my sister and niece coming for a visit.  Qwen and I are going to have some fun in the sewing room...  ;-)

Thursday, January 27, 2011

Barbara's Door...Finished!

This "home portrait" was a meaningful and fun experience for me. I am happy with how it turned out.

I asked Barbara for a short phrase or quotation for me to embroider on the piece. She gave me a lovely line from Emily Dickinson.

"Where thou art, that is home." How beautiful....

Barbara is engaged to be married, so I wonder whose portrait might go in this locket?

I can guess....

I do know that whomever goes through Barbara's door will find grace, beauty, and wit.

She is making a Madonna piece for me in exchange for her home portrait. I'll show it to you when I receive it....
Blessings on your house, Barbara!

Monday, January 24, 2011

Barbara's door...Progress

It is a fine place to work, for sure.


I've got pelicans, dolphins, and the occasional dog walker on the beach for company as I stitch.
There's been good progress on Barbara's Door.

I am happy with the feeling of this because it really does express my idea of Barbara herself...

There is a quotation that is going to get stitched on in the bottom corners, a little beadwork to add, and a few more details...but this is getting close to done.

Stay warm up there, dear friends!

Saturday, January 22, 2011

New Project....Barbara's Door

Even while walking 6 miles every day along the beach, I am still managing to get some stitching done. (We are being so good!) I started work on the house portrait for my friend Barbara.

The photo she sent was of her entryway. I pieced it into a large rectangle before we left home.

This measures about 12" X 16".
These were the colors that lept to mind, but I knew that they would just serve as background for embellishments.

After I stitched the "architectural outlines" on the transferred photo, I started adding the floral frame around the doorway.
The concept of the shrine keeps coming back to me when I think of Barbara. Part of that is her deep ties to Mexico, and part is the fact that I am working on her piece while in this devout and sunlit country.

She uses a lot of yellow in her quilts, too. ;-)
This is early days but the basic structure is in place.

I will be teaching a class in Home Portraits this year.....stay tuned for further details!

Sunday, December 12, 2010

Home Portrait for Meg...Finished!

I can't wait for Meg to get this in the mail on Monday!

It was so much fun adding the "weather" to this piece. I plan on developing this whole concept of home portraits more fully over the next year, teaching it too. (Stay tuned....)

A detail.....

The flurries of snow actually act as a secondary frame--there is another across the lower left corner. They each cover a part of the photograph that would have been difficult to augment with stitching or just wasn't that visually "necessary" to show anyway.

This measures 12" X 15".
Gosh it was fun to do!

Now I have a couple of quick Christmas stockings to whip up...a niece lost her Christmas box during her last move, you see......

Wednesday, December 1, 2010

Home Portrait for Meg...progress

I'm enjoying creating my little snowstorm for Meg's home portrait!
I've prepared this small piece (it is about 12" X 14") for lots of handwork while I am on the road this week.

I used some Mickey Lawler SkyDye fabric in the frame to suggest a pale winter sunrise...had to get a smidgen of warm color in there. Mickey sure knows her skies!
There is lots more tree embroidery to do, and the house embroidery needs refining...but what I am most looking forward to working on are all the little snowflakes and beading to come...

Back next week. This should be finished by then....happy stitching to you all!

Tuesday, November 23, 2010

Home Portrait for Meg

I am definitely flitting between genres at an accelerated pace these days!

Putting aside my investigations into the delights of my Go! cutter and other new tools for the moment, I'm making a portrait of one of my friend's homes. This is the picture she wants, and it printed up beautifully on the silk crepe de chine I got from Out of My Mind Prints.

Yes, that is a hoop...I don't normally use one but for the fine stitching required (as the scale is so small), a hoop will help me stitch in an even straight line.

I wrote about creating "place portraits" in the recent issue of CQMagOnline. You can read it here.

I'm looking forward to working on this one...and it matches the weather outside too. ;-)

Wednesday, September 15, 2010

I'm Guest Posting on Pam Kellogg's Blog

I love Pam and was honored to be invited to be Guest Blogger on her blog today.
"Embroidered Place Portraits" is my subject....I go through the basic process for creating landscape based crazy quilts--it's a kind of condensation of many posts I've been making here, with pictures of various projects, source links, and a few technical tips as well.

So head on over to Kitty and Me Designs if you are interested!

Wednesday, September 1, 2010

"High Summer"....Finished!

Thank you all so much for your very kind comments about this piece. It really was fun to make.

All I did to finish it up was put some cording along the edges between the central image and the lace, and between the white "mat" and the green "frame"...and then back and bind it.

I am very excited about my new Simplicity Bias Tape Maker, as this quilt's binding will be the last time I make wonky and wobbly velvet "bias tape". From now on, professional results will be mine!

Remember, this will be hanging at Quilt Market and Quilt Festival in Houston this fall, as part of the Celebrity Mini-Quilt Auction. It you are there, stop and say hi to it....

I'm off to Michigan for a week tomorrow with no internet (except a neighbor's Wifi)....back at you soon....!

Thursday, August 26, 2010

"High Summer"...Flystitch Marathon

I decided to keep a tight rein on the seam embellishments for this piece, as I wrote in my last post.
I have always loved those old crazy quilts that use the same stitch on all of the seams...so I tried that here. Fly stitch and more fly stitch!
The colors were also kept under control...green for the outer border, blue for the inner one.

First a close up...

I varied the weights, fibers, and thicknesses of the threads so there was some choosing to do as I worked...but those parameters were pretty strict.

Overall, I hope this approach helps unify everything, and not detract too much from the central focus...

What's left to do is some couching of some cording between the borders and a smaller thread couched around the central image, between it and the lace. This after I block the piece and hopefully get it all straight and square.
Then on goes the binding and it is done!

Sunday, August 22, 2010

"High Summer"..Ready for Seam Embroidery

Oh, this has been fun!!!!
I finished the stitching on the central landscape image and then I got to piece and assemble the borders that go around it.
You all know how much I love crazy piecing...

Here's the work area when there was one more border strip to go.

If you could see the rest of the sewing room--and the whole house, for that matter--it looks like a bomb went off. Tomorrow I will clean it all up.
The stitched scene has been stretched and fused over Fast 2 Fuse craft batting. I've never done this before but it worked great: keeps the fabric flat, gives a nice edge, and you can still add more stitching by sewing right through it if you have to after it is mounted (which I did.)

The scene needed a few more flowers added so that it could hold its own better up against the borders.

It was great to use some thicker threads and warm colors at last.

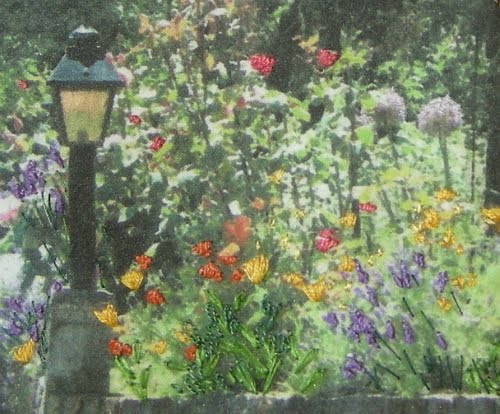
To see how much importance the photo behind the stitching truly has, have a couple close-up looks...

It's amazing how the eye blends everything together.

It was a little tricky deciding what to stitch and what to leave as bare photo. But everything was aimed at maintaining a believable perspective of depth.

Because this central scene really needs to dominate the quilt, the borders had to be kept tightly under control. No warm colors, an all white inner border to really offset the center, and values carefully managed as well.
But I did have all the leeway in the world when it came to the weaves, textures, and fiber content in the border fabrics. This is one place crazy quilting comes into its own, I believe. Heavily quilted quilts just can't showcase this essential element of great fabric, IMHO.

Above is an example.
The borders have everything from burlap to felted wool to embroidered cotton batiste in them, as well as heavily woven silk jaquards, hand dyed cotton and silk, velvet, and even some hand crocheted lace....

It also took some extra work to make everything as square and straight as possible (my weak link)...but this isn't too bad.

Now to embroider all those seams in the borders.
My touch must be very light....again, nothing must distract from the central image. But this is a crazy quilt, after all, and those seams must be covered! I'm looking forward to it...

As a reminder, this quilt, which is 18" X 20", will be auctioned off at Quilt Festival in Houston this November. It is part of the Celebrity Mini Quilt Silent Auction with proceeds to benefit the International Quilt Association's fine work in promoting excellence and education in quilting. So if you'll be at Quilt Market or Quilt Festival, stop by and say hi to "High Summer"....and if you are so inclined, put in a bid!

Tuesday, August 17, 2010

"High Summer"...Stitching Almost Done

The embroidery over this printed photograph on silk is just about completed, which is good, as I am ready to move on!
Still, it has been fun to work my way towards the foreground of the image. Another day or two of stitching in the shade here (it's been blazing hot in the Northwest this week) and I should be ready for the next step, which is attaching the borders....

Click on the picture to see the details....

Hope you all are enjoying your High Summer too....

Monday, August 9, 2010

"High summer"...Background Stitching Complete

"This is going to be a big project: smaller scale, but lots of stitches."
So said my friend Barbara Curiel in her comment on her last post, and wow was she right.

I haven't had too much time for concentrated work on this, but even so, from looking at the back you can see how much stitching there is and how fine the thread is. It's kind of funny to be working at such a small scale that one strand of embroidery floss seems thick!

The colors are subtle and this will be the kind of piece where if you don't look attentively, you will miss what's happening. But that's fun too....

Do click on it.
I think it is usually a good idea to work from background through the midground to the foreground in these embroidered landscape/house portraits. The background is now done, except for a few tweaks later on.
For the midground I ordered some new threads from Evening Star Designs.

These are overdyed perle #12 cotton--with one rayon thrown in. This will seem huge to work with!
The flowers in the foreground of course will have the thickest threads. But I don't get to play with those quite yet....

Wednesday, August 4, 2010

"High Summer"...Stitching the Background

When you are using machine sewing thread to embroider with, progress is necessarily slow. But the scale is so small in this print that use it I must.

I've been working on the tree area at the back of the garden, and the even more distant plantings behind the grassy area to the left of the tree.

Click on the photo to see if you can...but this is pretty subtle, tiny stitching, except for that "huge" Kreinik metallic on the right part of the tree, where the light is hitting it. All this will play a supporting role to the larger, flashier flower embroidery up front, but that comes last.

Still, I had to try it on a little sample, just for fun.

One can only stitch with dark green machine sewing thread for so many hours without a break into color. There could have been more added here, but back to work I went.

This is just a small section of the piece (as you can see by referring to the first picture.)
It is all taking longer than I thought it would, but I just have to see how the whole image looks when enhanced this way....

Saturday, January 3, 2009

Cottage CQ...Cottage Embroidery Finished

There may be a few finishing touches, but the embroidery on the central cottage image is pretty much done.

It was a challenge to keep it all flat without the use of a hoop, but overall that worked out alright.

See for yourself.....

I tried to keep a light touch with the flower border along the front of the porch. The stitching is just to augment the imagery that is already printed. It's not supposed to draw a lot of attention to itself.
I filled in the area of the grass that's in shadow, but decided I didn't need to do the whole lawn.
And it was fun to do the flag!

There will be some tweaking down the line, but this is surely it for now.

Next it is time to shift gears and think about those waves along the bottom section of the quilt.....

I hope to get this top done before leaving for Mexico on the 17th of this month.
We'll see!

Thursday, January 1, 2009

Cottage CQ...Buttonhole Leaves Completed

These took an amazingly long time!
I went through two 5 yard skeins of silk floss using them single strand for the darker leaves and double strand for the lighter ones.
I outlined the tree trunk and honestly don't think I need to add anything more to it.

Now I get to embroider the flower border along the front of the porch. I've been looking forward to this part for weeks and weeks..... You know me and flowers.......
Then I'll do the flag....but I think I will skip that satellite dish. ;-)

Happy 2009 everyone! Thanks so much for your interest in the blog and your comments over the last year...here's to many millions more stitches amongst us all in the new year.....
*CLINK!*

Monday, December 29, 2008

Cottage CQ...Buttonhole Leaves

...and more leaves and more leaves!
I took a day off from the CottageCQ thinking I needed a break...but decided instead to bear down on my focus and just go for it. I don't even want to come up for air until this central section is embroidered, and that could easily be another week or two because the pace is s-l-o-w.

I know I've mentioned before that I think of these long term crazy quilt projects as my "novels". And as I stitch away, more often than not in silence, some wonderful thoughts and ideas bubble on through my mind. I'm not sure if this could happen for me if I worked in any other way.
When my attitude is right this kind of work is swiftly transformed from being boring to contemplative.
In fact, those rich inner experiences are really the goal...the stitched project is actually a by-product. (But a nice byproduct.)

I got the idea for the buttonhole leaves from Jo in New Zealand and Lisa in Arizona. Both have used them beautifully in their work.

The darker leaves are single strand silk floss and the lighter ones are double strand silk floss, both from Vicki Clayton's Hand-Dyed Fibers.

I still have about half again as many of these leaves to do, but you can begin to see their effect.

I finished up the rooflines, too.

And now it is back to the buttonholes... ;-)

Friday, December 26, 2008

Cottage CQ...Embroidering the Cottage 2

Is everyone still stuffed from Christmas treats?
I sure am!
There's one piece of baklava left......

We are still snowbound....

....including Chad, whose car you see here. But this fine 18 year old guy has been mellow hanging out on the hilltop with his parents for a whole week. Amazing!

There hasn't been much to do but eat and stitch and watch TV, and I have made some progress embroidering the cottage.

I've outlined the basic shapes on the cottage, minus the outer rooflines. They have to wait until the background tree embroidery is done. I've been working on that and if you click on the photo you can see it.
But my goodness it is b-o-r-i-n-g work.
I hadn't seen it up on the design wall in over a week, and wasn't sure if the embroidery on the house was working with the overall look.

There is some squaring up to do along the top edge (it will be covered by cording so that's not an issue)....but I was relieved to see all is coming together o.k.
Still I'm going to take a break and have my annual "go mad in the sewing room" week between Christmas and New Year's.

And....since I've managed to gain four pounds since the beginning of December.....

...our new weight bench looms as my immediate destiny.
My body builder son can't wait to make me suffer!!!!

Monday, December 22, 2008

Cottage CQ...Embroidering the Cottage

I hope everyone is snug and cuddled up in this wintry weather. We have had our share of it here in the Portland area. In fact, we are marooned on our hilltop as the driveway is iced and impassable, the car parked below buried in snow drifts...all in all, great Christmas weather!

So we keep on stitching in times like this, don't we?
I did move my "sewing station" to the TV Room, as that is where the action is while Max and Esther are here visiting.

I've started embroidering over the cottage itself, and can keep steady work going in the midst of the family doings (watching "House" and playing the XBox). It's fun. Oh, and if you want a better view of that crazy quilt on the wall behind the Christmas tree, look here. Click on the image and it will get bigger.

I can't "hoop" the cottage area for the embroidery, so I am using pins all the way around the printed image to stretch it taut.

Can you see the pins going all the way around the edge? This is working well.
I've begun embroidering with a single strand of cotton floss around the rooflines and windows. I want to anchor everything in place this way before starting on all the leaves behind the cottage. When doing house portraits like this, it is best for me to start in the background and finish up in the foreground.
This is careful work requiring a steady rhythm, but so far is going well.

Meanwhile....all the blogs probably have their snow stories and I have mine too...except it is about ice.
As in, it is covering the entire southfacing side of the house. Remember that fine view I posted a little while back?
It is gone. Robert decided that "desperate times call for desperate measures," so he took matters in hand.

Arming his squirtgun with hot water......

He blasted a hole in the ice squirting the hot water on it.....

...so Esther could glimpse the view.

Here is how it looks this morning.....

This ice will eventually fall off in sheets with marvelous crashes down below when it finally starts to warm up.
Meanwhile, stay safe and warm everyone!