Showing posts with label techniques: letters. Show all posts

Thursday, September 5, 2013

Noah's Quilt

My niece Naomi and her wonderful husband Dino had a baby boy in June.  I finally get to meet the little prince this week-end and will come bearing his baby quilt.

I have got this burgeoning passion to work with vintage textiles, incorporating them into contemporary quilt work.  For Noah's quilt I dipped into my Ebay bin of old blocks, tweaked a few of them, assembled them with some old jellyroll Moda sashing, some plaid cotton upholstery samples, and a few quilters cottons that I had on hand....seriously, this went together F-A-S-T, especially as I quilted it on the HandiQuilter Sweet 16 and machine sewed a ribbon binding on it.  4 days was all it took, with time off for baseball too!

One of the blocks needed red in it to match the other two I used, so a quick applique job took care of that!

Another block had its center taken out (you can see it on the left), with some vintage feedsack cotton swapped in place, so that I had a place to put the name.

These letters have fusible web on the back.  I've learned the hard way to always always always use a ruler to line them up before ironing them down.


 And here are the blocks, ready to be sashed and bordered!

You can see, this will be quick....

Sashings and borders on, piece of cake!
Then I used a tip I learned in Cindy Needham's Craftsy class, "Design It, Quilt It".
Maybe you all know this but I didn't: tape the quilt back to the table nice and taut before layering it with batting and top to pin baste.  What a difference this made! You can see the tape in the upper left corner.

I enjoy making an all over fan quilt design, freehand, no marking.  Easy peasy, and really fun.

A plaid taffeta ribbon made binding the quilt a snap.  What you see here is one of the corners from the back.
One line of zig zag stitch, carefully making sure that the front and back binding edges were sewn down, and it was a done deal.

I didn't want to make a big ol' label but thought a little inscription for the record would be better for this baby quilt. I used a Pentel Gel Roller for Fabric pen.

And here is Noah's quilt, ready for delivery...

 
It is 46" X 48".

Hooray for Noah!


Saturday, March 26, 2011

For the Schmalbergs

I've been adding bits of flash to Jill's Quilt....

.....but am taking time away from that now to create a wallhanging for my friends at M & S Schmalberg. They make custom fabric flowers the old fashioned way, on brass molds and by hand. They are located in the Garment District in New York City, and I will get to meet them when I travel to the East Coast in a few weeks!

I've done lots of lettering on quilts over the years, but never with wool felt. After this, it will be hard to use anything else. It is very forgiving and has a nice saturated look.

The letters are cut out and ready to be sewn onto this prepared background (prepared with interfacing, that is. I never machine applique anything without interfacing anymore, if I can help it.)
That Sulky spray is to adhere the letters to the background for sewing.

Before the letters went on, I put that pretty lace that my dear friend Pam Kellogg sent me over the background, to make an interesting texture.
Then after smoothing the sticky letters on, I zigzagged around their perimeters with a clear monofilament thread.

I changed needles for the smaller letters, to a Microsharp size 60. This leaves the smallest hole, which even though this is felt, is a good thing. There is less distortion in the sewing if the needle is fine, too.
I used the lace to keep the letters lined up...spacing is always an issue too. It worked fairly well.

And you just know what is going to happen next......

This is going to be a very enjoyable week-end!

Thursday, February 24, 2011

"Alliances: Soil and Sky"....Finished!

"Care less for your harvest than how it is shared and your life will have meaning and your heart will have peace." ~~Kent Nerburn

I decided this would be the perfect quotation for inside the heart of my project for the Alliance for American Quilts... My friend Barbara thought it was a new take on putting a quotation in a sampler, an idea I love and had not thought of! But she is an English professor... ;-)

You do have to look closely to read it. I wanted to fill the space of the sky but not make it too contrasty with all the lettering.

After this stitching was done, it was time to finish the edges of the quilt. I wanted to retain the intricate shapes of those sunflower petals...and that took some doing!

I have layered my top, "batting" (which is really flannel drapery lining) and cotton backing all together, spray basting them with Sulky KK 2000. Next I zig zagged the layers together with a 1.5 mm stitch all the way around the perimeter of the quilt. Then I trimmed as closs to the zig zag stitching as I could.

Then I made two more passes with the zig zag, first at 2.5mm, then at 3.5 mm. I learned this technique from Rosemary Eichorn's book, The Art of Fabric Collage.


I used Coats and Clark variegated quilting thread in the top, and a lightweight embroidery thread in the bobbin.
The edges are not as perfectly clean as I would like, but there were a lot of fine points and I could not for the life of me get the free machine zig zag to work on my %^#$%* Pfaff. Still this is acceptable.

I hope that as a composition this works well whether the viewer can see the writing or not, and that the piece has as much impact and meaning with it as well as without it too.
There is more to explore with this concept!

Meanwhile, this quilt, as all the entries for this year's contest, will be shown in Paducah in April at the American Quilters Society show, as well as at other venues throughout the spring and summer, and auctioned off on Ebay in the fall, proceeds to benefit the Alliance for American Quilts.

I can't wait to see the other entries!

Friday, September 24, 2010

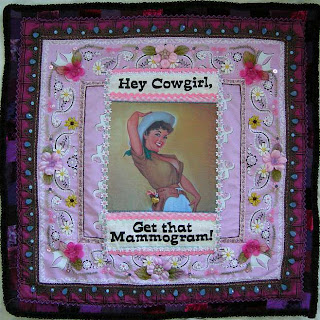
"Hey Cowgirl...."

Ever since I got back from Michigan, things have been hopping on the homefront, so I haven't had much time to stitch.
But I finally finished the project I started a few weeks ago at the cottage. I've loved working on it because my cowgirl is such a cutie. She is also promoting a very great cause: breast cancer awareness.

Some background: My friend Michele Muska is in Marketing Communications for the Simplicity Creative Group...the makers of patterns, trims, yarn, tools...all things we quilters and crafters love.
Michele invited me to join the Designer Bandanna Quilt Challenge for 2010....Simplicity is selling pink bandanna designs with some of the proceeds going to breast cancer research...they will be holding a similar challenge for the general quilting community soon--this challenge for designers is to get the ball rolling.

So as I was holding the pink bandanna in my hand, all I could think about was cowgirls...and one thing led to another....


I did write to Michele to make sure the image I used was o.k.....my cowgirl is saucy and quite lusty....but she's still innocent, too. And most of all, she's healthy...

Hey Cowgirl...
22" X 23"
copyright by Allison Aller 2010

My goal was to present an upbeat message on a serious subject, in a way that would make people smile (and mens' heads swivel!) So all you cowgirls, get those mammograms, you hear?

Sunday, September 14, 2008

"Brooke"

This was a fun little commission project that will be given as a gift at a baby shower.
Little Brooke should be arriving mid-October.....

I wanted to create something of quality but also fairly quickly, and this is what I came up with...

I have created an entire alphabet of flower letters that I can resize and print up as the need dictates. These letters here are approximately 2 1/2" square, on cotton sateen. I have put fusible web on the backs of them and am about to iron the onto the linen.

This shows the 505 spray I used to baste the drapery lining--a thick, loosely woven flannel of cotton--onto the back. I decided to do some more machine quilting, as I really did enjoy the look of that center circle on the White Tote.

I machine-buttonholed around the edges of my letters, then machine quilted around them, and finally added some hand embroidery.

For a speedy finish, I used the "envelope" approach, sewing the back to the front right sides together, leaving an opening, and then turning it right side out.

After it was turned, pressed, and the gap sewn shut, then I added the border. Kind of backwards, I know, but this worked fine for me. I machine-buttonholed the trim on the inside of the border, and whipstitched it closed on the outside.

This little item measures 5 1/4" X 19 1/2".

I do love working with those letters, and have been wondering for quite awhile now if others would too...enough to buy them on a CD from me. Would you mind giving me a little feedback to help me decide whether to make them available? I think I would come up with numbers, too, and put on some mandala floral designs on the CD for good measure. $20.00 includes postage....what do you think?