Showing posts with label materials: angelina. Show all posts

Friday, June 24, 2011

"Rainy Spring"...Assembling the Center

As I was trimming my blocks and re-pinning them up on the design wall, I happened to pin one of the center blocks upside down.
It was one of those accidents that changed the direction of the quilt in a fairly big way!  I decided to make the center into a circle, truly representing our seemingly absent sun.

I knew that I had to complete the circle shape though, and that required some fairly technical surgery this morning.

I began by sewing the blocks together, but leaving the seams open where the appliqued little quarter circle shapes would go in.  I knew I had to line them up perfectly, and wanted to have as much control as I could.

 First I had to make the four little corner lace collages.

 Then I pinned them in place and appliqued them along both sides of the corner of the block.

 The ribbon was carefully pinned into place and sewn down, so that when the center blocks were completely sewn, the circle would look round and continuous.  Dicey!!!


Not too bad.

Here is the center sewn together, fairly well pressed, fairly round too.  *Whew!*

But I still needed some sun.  We all know it's there, behind the clouds....

 The Accuquilt Go! cutter is absolutely invaluable when perfect circles are needed, in this case out of holographic and bonded lame.


And then I dove right off the deep end.
A long time ago, I saw a quilt by Terrie Hancock Mangat where she painted all over it after the whole quilt was done.  I thought that was so gutsy of her to do that.  So what the heck, I decided to fuse some Angelina fiber over my finished and assembled center blocks.

No going back! Especially after I fused down my Angelina layer with this great new product from Shades Textiles, a very very fine fusible web called SoftFuse.  I got it at Quilt Market.

Oh my.
Could this have actually worked?

I think so.  When the real sun shines on it this glows.  ;-)  Wish I could capture that here in a photo...the quilt actually looks much more yellow-ey golden green than this...


...like the trees do at the end of the day when the sun slips in under the clouds, sideways, and lights everything up.

I took quite a flyer at this stage of my quilt, and could have crashed in disaster.  But it was very fun to take the risk! Now maybe I can finally sew the rest of those blocks together...

Thursday, November 5, 2009

Vintage CQ...Flower # 23

"Oh, Mexico,
It sounds so sweet with the sun sinking low...."
Remember that great song?

Indeed it is sweet here, watching the sunset in San Carlos, Sonora, Mexico.....
It's been beautiful.

Still managing to get a little stitching done, though. Here is flower #23.

These are little angelina flowers made into a lilac spray. The leaves are of wool and silk felted onto cotton, with the beads added to the outlining buttonhole stitch.

On another note, we are midway through the second week of the crazy quilt auction on Ebay benefiting the Alliance for American Quilts. Head over, have a look, and bid!

Wednesday, August 20, 2008

"Friends"...Angelina Flowers

I am not ready to stop making 3 D flowers!

My angelina flowers are an improvement on the blue flax and dianthus that went on the Spring CQ. This time I used much heavier fusible web to bond the angelina to a piece of silk so the two layers won't separate. Here's my process....

This is my little pile of angelina fibers..actually, two different colors that have been blended together.

You layer your fibers between two sheets of waxed paper...or in this case (as I am out of waxed paper) some release paper from some fusible web.
Angelina loses its sparkle if you apply the heat for too long. The idea is to tap it with the iron just long enough for the fibers to melt together.

Like this!

Here are my layers of silk dupioni, fusible web, and my sheet of angelina.
The silk isn't necessary really...you can cut out the angelina and it would act just like fabric (with no raveling of course). But I wanted my petals to be a wee bit more substantial.
When fusing my layers, I ironed with the silk side up to avoid putting direct heat on the angelina. I wanted that sparkle!

It was a simple matter to cut out my petals.

And then I cheated. Instead of pinning all my petals into place on my quilt (and making holes in the angelina that I didn't want), I first glued them into place with my trusty E6000 glue. This is probably a disaster in terms of archival issues, but oh well!

Sometimes expediency is virtue enough.

I was a good girl and did tack them down with some beading thread, though...

...and covered my center with a sequin and a bead.

Here is the wreath of flowers as of this morning....

It's getting there!

If you are interested in getting some angelina, I bought mine from Betty Blais of Embellishment Village. She and her husband are great folks to do business with.

Thursday, June 5, 2008

Spring CQ...Perennial Blue Flax

I LOVE this flower.
This picture is off of Google Images...my plant in the garden, alas, is shivering in the 50 degree rain, and is not ready to bloom yet.
But still, it was time to put the Blue Flax, (or Linum Perenne) on to my quilt.

Time to break out the angelina fibers...

I got mine from Embellishment Village. After arranging the fibers onto a surface they won't stick to--this is kitchen parchment paper--you place more parchment paper over it and give it a quick tap of heat from the iron. This fuses the fibers together. Too much heat and they lose their sparkle, though.

Here is my fused "sheet" of angelina.

Chad took this picture and we both think it is pretty funny.
I had no flowers to draw from, so I just hopped over to Google Images, found a picture of the Blue Flax that I liked, and traced right off my computer screen.
(Gardener's hands, I know.)

Before cutting out my shapes, I fused my angelina sheet to some lightweight blue silk habotai using Misty Fuse.


Fast forward here....aren't these fun?

Here is a larger view of them.
I'm not sure "who" will go on next. I have many seams to cover as I am making up my mind...I don't have this planned out beforehand!

*A quick heads up!* Debra Spincic has just finished and posted pictures of her wonderful masterpiece quilt "Tropical Tree of Life". Do go see it...you've never seen anything like it. Totally fantastic work, Debra!!!

Wednesday, April 2, 2008

An Embellisher Teacher comes to Call

Catherine Smith teaches the embellisher class at Portland's premier sewing center, Montavilla. She found me via the blog here and we have been corresponding for awhile...and yesterday she came to visit for the day, bearing knowledge and inspiration! She brought lots of different materials for felting for me to examine, including different kinds of silk and wool roving, angelina fibers, tools I hadn't heard of, books and magazines that were new to me...just a born teacher, she is. We ate cookies and talked, ohhed and ahhed for about 6 hours. It was such a treat.

She wouldn't let me take her picture which was a shame because she is very pretty! But I could photograph the angelina flowers on her shirt...these were made with a sheet of angelina and her embroidery machine.

And while we are on the subject of angelina--which I had never used before, and which by the way you can purchase at this great website, DesignsByDawn--here is a butterfly Catherine made, also with her embroidery machine and angelina.

More butterflies made with angelina and her embroidery machine...these she gave to me! Aren't they obvious candidates for a crazy quilt?

She made this bowl with her embroidery machine and angelina...I think it is absolutely stunning. She used metallic thread in both the top and the bobbin. (Different machines handle the various makes of metallic threads differently, and Catherine knows them all. When I go to her house she is going to help me really nail metallic sewing with my humble Brother machine.)

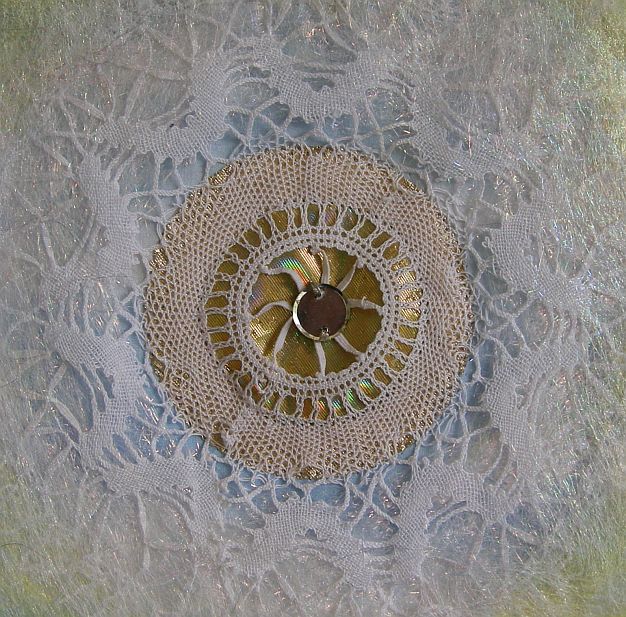
Catherine brought a whole palette of angelina fibers, both the fusible and non fusible kind, and let me choose my palette and create my own sheet to use in future projects. So here is my first angelina!

OK, on to the felting.
Catherine brought several of her projects to show me how different felting techniques and materials can be used.

This piece uses many of them. Some of the silk is just barely "tacked" on the surface with the embellisher, while the base behind it is felted to make a smooth surface. The fuzzy yarns were hand couched, to preserve their fuzziness, but yarns can be felted into place as well. The purple base is commercial felt, and she uses a cotton batting as a foundation. Beads were added last.

If you have already beaded your piece but there is more felting you want to add, Catherine showed me a great new tool by Clover that is just the thing:

Click on this picture so you can really see it. This little gizmo has three felting needles and you can very articulately felt in fiber right alongside your beading (or whatever). This is a must buy, I think.

This is a felting base, also made by Clover. You put your hand felting onto it and punch into the bristles...instead of into your hand or lap. This little item is spendy, about $20, so I think I will find an alternative solution. Styrofoam, for example...

Indeed, felting has so taken off that the business world has recognized a receptive market for new products...such as this blank woolen totebag that is already felted and ready to decorate. She bought it at Fabric Depot in Portland for about $15.00. It was made in Nepal.

This is a sample that Catherine left with me that really intrigued me. Some of the fibers are totally blended into the background with the embellisher, and then they get progressively looser, to the point where they need to be couched on by hand. This concept has so many possbilities, especially for nature type scenes.

Finally, Catherine brought the latest copy of Jenny Haskins' Creative Expressions magazine, which I had never seen before. You can purchase it here. This sweater was created by the Japanese fabric artist Nobuko Ema, and the magazine has detailed instructions for how to create the gorgeous embellishment on it. The look is simply to die for, in my humble opinion.
Thank you, Catherine, for a lovely day!

******************
Switching gears entirely, here is a link my brother just sent to me, from the Museum of Scientifically Accurate Fabric Brain Art. (I am not making this up.) As my brother said, "It's not just the intersection of science and art, it's the intersection of science and fabric art! You are part of an amazing, demented, brilliant community, my dear!"
Isn't it so?