Thursday, October 27, 2011

Flower Experiment...progress

I have a very nice spot in which to work.....

You have to love a place with no phone or TV, but excellent WiFi....lapping waves...sparkly sunshine...
The bright colors all around are just right for working on this project.

One of Debra's hummingbirds flew in!
As always, I am trying to use my seam treatments to "shape" the composition of this piece.  If these flowers were still available when we get home, I would do more pounding and take more pictures to add another border of them...but alas, by then they will be gone.
Still, this is a nice warm up for what could be a large project next year.....

Sunday, October 23, 2011

CQ Borders for the Flower Experiment

I made some borders to surround the printed photo from my pounded flower experiment.  It was so nice to work with these bright colors...a way to thumb my nose at the gray skies descending I guess.

I plan on working these seams and adding a bit to the center while on vacation this coming week....I have no idea where this is going to go, but I know that I am going to the beach!

Friday, October 21, 2011

Flower Pounding Experiments

This all started with an email from my lovely friend Leonie Hartley Hoover.

I thought her design (above) was most intriguing!
Leonie included a link to a tutorial for how to do this here:


And this was what she had to say about her experience:

There are a few tutes out there on the net and I've listed one below from a reliable source I know of to give you an idea how it is done. This gal also wrote a book on it.  Some people mix alum and soda for the bath and some folks just use soda.  For my own use, I found the best for color density was plain baking soda and I soak the cloth for about 48 hours squeeze it gently and shake it out and then let it air dry. My experience with Borax, which some suggest using, was that the pounding faded more quickly over time.  The finished cloth is never washed, as even with heat setting, washing destroys the colors.

For more prolonged longevity, you can do the flower pounding, then scan the fabric into your computer and print out the image on other treated fabric. Lots of options to play with here.

Another thing you can do is tape the flowers down on the fabric if you like with wide masking tape and then do the pounding.  Lift the tape carefully and then put the tape (with the squashed remains) down again on another piece of fabric for a softer, more delicate pattern.


For the one I made today, I did not use tape at all, I just positioned carefully with my fingers and watched where the hell the hammer hit (-:  and I used plastic food wrap instead of wax paper. My foray into the process today was to see what colors would appear from different plants. For more control you can use tape or even remove the petals one by one and place them carefully on the fabric.  There is still some movement however and rarely perfection!  However, it is fun to try all the possibilities.

Alright I just had to try this!!!!!  And I had a blast.....
I followed Leonie's lead and just soaked my fabric in a baking soda solution and then let it dry for a few days.
During some "test pounds" I learned that red flowers turn into grey so I didn't use any; the oranges and yellows worked bestAlways have a test cloth nearby if you are trying out new flowers or leaves.

I had taken individual petals from calendula and California poppy, taped them down, and then pounded them.  This circle is about 6" in diameter.  The fabric is a silk/cotton blend.

I decided to build (or pound) my composition in stages, so here is the next round.

Those colors sure do shift!

Here I have added some of those striped zebra hollyhocks, and they changed from lavender and purple to aqua and blue!  The marigold leaves are in place about to be taped down and pounded.

One more round, with more poppy and calendula petals, and some fuzzy lamb's quarter leaves.

Taped and ready to go under the hammer.  Wider tape would have been better, but this is what I had on hand.

Here is where I stopped.
Now, the problem with pounded flower pictures is that they fade. Victoria asked about that in the comments from my previous post.  As Leonie mentioned, some people scan the finished fabric even while it is still wet and then print that onto fabric, thus capturing that glorious but evanescent pigment.  I didn't want to get my scanner icky, so I decided to photograph instead.

***Edit:  See Leonie's comment below!  You need to heat set the finished pounded fabric, especially before you scan it (no wet fabric in the scanner allowed.)***

That gave me an idea....
I figured if I was going to have to print the image anyway, why not add some unpounded flowers on top of the fabric?  That way I could get some of those reds and pinks I wanted, and of course sharper detail.  The pounded fabric would then serve as a background...and a very nice one, too.

Ah, this was fun....this is the photo, and below is the printed fabric (it is cotton lawn; I use EQ Printable fabrics for their dependably high quality results), next to the pounded fabric.  


The print is actually a bit larger than the original pounded fabric.
I love the background but it is going to fade.  I have the picture though in case I want to print it as is.

My plan is to create a border to go around this printed bouquet and make a little wall piece for my upcoming special exhibit at Road to California in January.  Fun!

Tuesday, October 18, 2011

October Flowers

It is very busy around here, buttoning up the garden before the next rains hit...so I'm not getting much time in the sewing room.
There are a few blooms left though....

Love those dahlias!
I've been playing around a little with flower pounding too...wish I had more time for this!

A simple lay-out.....

...turns into this!
I hope to have more on all this in my next post....
Happy fall, everyone!

Friday, October 14, 2011

Test Driving the Sweet 16 with David Taylor

That's the HandiQuilter Sweet 16, which I have been lusting after for the past couple of years.  It is basically a sitdown quilting machine with a very large flatbed surface to work on.  You push the fabric around under the needle, unlike on longarm machines where you guide the movable needle over the fabric.  There are no feed dogs and no presser foot.  It is strictly for free motion quilting.

David Taylor is a true pro in this type of work, and is an official "Ambassador" for Handiquilter, sharing his expertise and passion for this machine. 
He does detailed and meticulous pictorial hand applique, and then enhances the imagery with very close machine quilting, using hundreds of thread color changes along the way.  (He likes the Sulky Blendables 30 weight cotton thread for this, by the way, because their variegations in color are random on the thread.  Good tip there.)

Here is one of his quilts:

It's his dog, Maynard.

David's class was about "quilting organically".  He does not mark his quilts, but intuitively responds to his imagery by quilting "the way things move and grow".  I love that approach.....but as you know, I am not this kind of quilter.  My agenda was to see if spending a day with a pro and the Sweet 16 would help me see if I could integrate this kind of quilting work with crazy quilting in any way.  It has been an issue bugging me a lot.  Can it be done?
My friend Debra Hardman is great at it, which is why I wanted her quilt in my book.

 
She is quite the master.  I couldn't hope to quilt anything like this, but still I wanted to see what would happen, how it felt.

David started us out with a neat exercise.


He gave us some large scale floral fabric to practice on.
He also showed us how to handle a larger piece of work on the Sweet 16.

He's got the excess rolled up against the back, and has made "waves" in the quilt so that he can easily move the quilt around under the needle.  He likes to quilt from forward to back (probably from years on a regular sewing machine); he starts all his quilts in the center and quilts outward from there, turning the quilt as he needs to.

He emphasized how his lines are always curved, never in a set pattern of length.  He demonstrated by doing a freehand animal face.


He slowed the machine down while outlining the eyes.  The Sweet 16 lets you set the speed, a great feature.  But it is not a stitch regulator.  David again and again stressed that the movement of your hands has to match the speed of the machine.  Like in driving, how you steer and how much you hit the gas are definitely related.  He also said, "You don't watch the steering wheel as you drive, either...do you?" 
You are always looking ahead to where you are going to stitch, and your hands will follow your brain's lead....like in driving.
Naturally, this takes lots and lots of practice.

OK, on to my sample.  The jury is definitely out for me on this!  The results were crude, but held possibility...

First was my crazy quilt block.

Boo.  Quilting for quilting's sake on a CQ block is a no go, for me at least.  It HAS to be integrated and essential to the overall design of the piece.  And that could happen, especially if the CQ was pictorial in nature.  I do like the way the butterfly could move on the patch with quilting.

OK, next is the "Go Crazy" 4 block sample.

Again, boo.  No likey.

Then I tried messing with May the cat.

The face is a wash. (If I dived into thread painting however, that could be cool....) I learned that there is little point in quilting on velvet.  On the other hand, I kind of liked what could be done by quilting the white background doily.  Potential there.

 Next came the printed photo landscape.  This got me excited.

David said that I was embroidering here, not quilting, and he was right.  But that's what I do, so who cares?  What I liked was that with practice and a deft touch, machine embroidery could work on a photo of this scale.  I didn't know that before.

Finally, my biggest rush of the class.  I had brought one of the running figures from Mark's quilts to see how I might quilt that.  I asked David what he would do, so he sketched out some quilting lines and then I sewed over them.  I was thrilled with his idea.

Click on this to see...basically, David put the runner in context, with a simple road leading with perspective to a background.  I never EVER would have thought of this.  In heavier thread, this would be smashing.
While I won't go this detailed on Mark's quilts, I will definitely use the concept.  I had to hug David, I was so happy!

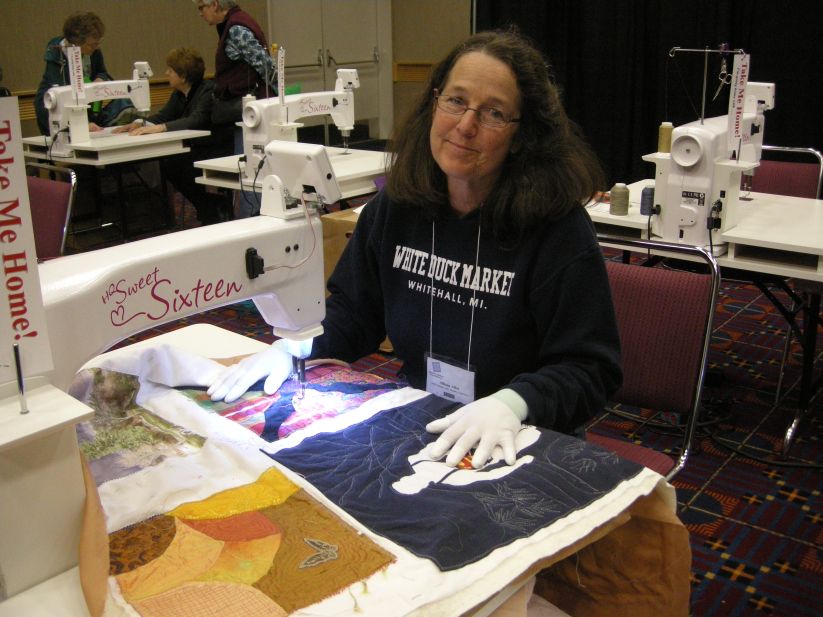
Another thing I came away with was this:

When wearing these gloves, it is very easy to move the quilt around under the needle, because you get such a nice grip.  They are breathable and comfortable, light and unobtrusive.  This was a major score, and will make quilting Mark's five quilts infinitely easier for me.

Do I still lust after the HandiQuilter Sweet 16?  Oh indeed I do.  But I can't justify the money for one yet; I can make my Juki do a lot of what I need still......but boy oh boy did I learn a lot in class, and am so glad I went.

Wednesday, October 12, 2011

Mark's Quilts....Madison's

This quilt is laid out and pinned, and in the process of being hand basted.  I've decided that instead of going over my basting with machine zigzag, I will leave my own stitches in place and skip the unnecessary machine step.  So I'm doing a more detailed job with the basting.

These quilts will all be quite heavily machine quilted, which is something I haven't done in awhile.
In order to get up to speed, I'll be attending an all day machine quilting class with David Taylor at the Machine Quilters Exposition, which happens to be in Portland this week.
I'm excited!

We were instructed to bring a quilt sandwich to class--either a top, or just plain muslin.  I have lots of different scenarios in which I might want to try new ways of machine quiltwork, so my sample looks like this:

I have an extra running figure from Mark's shirts.  I'm so glad I can practice on this before going to work on the quilts!  The quilt block above it will give me a chance to play with quilting on a crazy quilt block--something I have resisted for years.  The printed landscape photograph will give me a chance to use quilting as thread painting over imagery, something I'm sort of intruiged by.  The four block "X" is from my ongoing
"Go Crazy" project that I started last fall.  And finally, May the cat on the doily is another new situation for machine quilting.
I hope to have this sample filled by the end of class on Thursday.  I'll show you what happens!

Wednesday, October 5, 2011

Mark's Quilts....Ashley's

This is the third quilt of five for Mark's family. You can read the story about this project here.

It is very helpful to have a surface large enough for laying out the whole quilt at once!

I'm so glad I revamped the sewing room, it was just in time.
Laying the quilt out this way helps me get a more balanced design than I could have otherwsie.  It's tricky with all these images and disparate fabrics.  But it is flowing well....