I love where the Schmalbergs put my wallhanging!!!
 See it?
Here's a close up view....
 I am wearing a VERY big grin!
See it?I am wearing a VERY big grin!
I am wearing a VERY big grin!
See it?I am wearing a VERY big grin!
 What a fabulous place!
 As you can see, the walls are yellow and the tables a nice rich maroony-wood. That is what determined the background color and edging for my little wall-hanging.
 Once the lettering was on, I started by laying out a base of leaves. These are sewn on with a clear thread in a narrow zigzag stitch.
 Then I pinned on all the flowers.
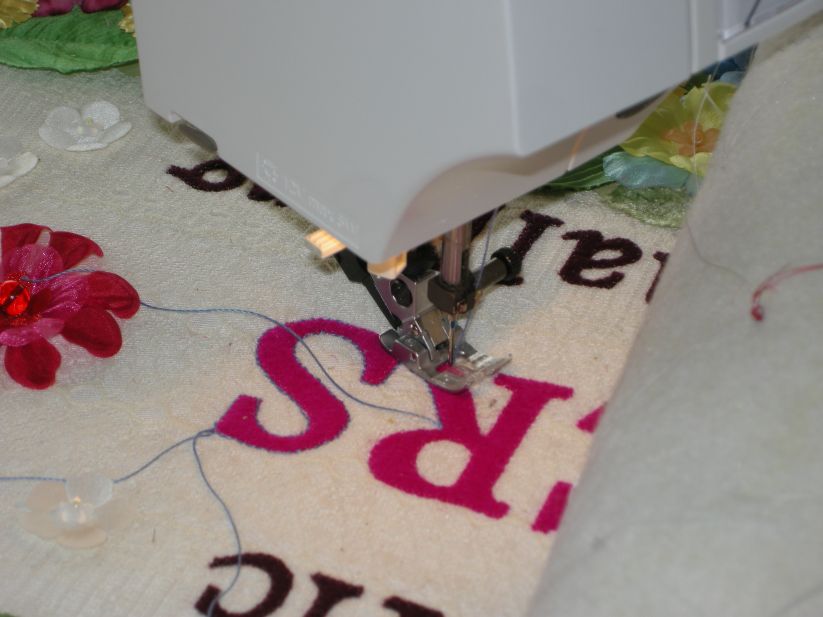 I decided the pink letters needed a little more definition, so I just straight stitched around them using an Aurofil #12 thread. I pulled the thread tails to the back afterwards and knotted them.
 It was fun picking out the various beads for all the flower centers.
 I can tell you, it will be a total honor to have this hanging anywhere in their showroom.
  .....but am taking time away from that now to create a wallhanging for my friends at M & S Schmalberg. They make custom fabric flowers the old fashioned way, on brass molds and by hand. They are located in the Garment District in New York City, and I will get to meet them when I travel to the East Coast in a few weeks!
 The letters are cut out and ready to be sewn onto this prepared background (prepared with interfacing, that is. I never machine applique anything without interfacing anymore, if I can help it.)
 Before the letters went on, I put that pretty lace that my dear friend Pam Kellogg sent me over the background, to make an interesting texture.
 I changed needles for the smaller letters, to a Microsharp size 60. This leaves the smallest hole, which even though this is felt, is a good thing. There is less distortion in the sewing if the needle is fine, too.
 This is going to be a very enjoyable week-end!
 The quilt will measure 45" X 54". The blocks at the moment are all roughly 6 1/2" square.
 We're all among friends here so I'm not too embarrassed....!
 I used the Go! cutter for the hearts, which made them very easy.
 And I used one of Simplicity's little square rulers to lay out trim in those squares within the blocks.
 Those flowers are from the Schmalberg's. (More about them in a couple of weeks.)
 Her company, Simplicity, is sponsoring the Cherish: Great Bandana Quilt Challenge. It is a contest with some big cash prizes...all to promote breast cancer awareness, raise money for research for a cure...and get people to try Simplicity's wonderful challenge tools, too.
 At least one of the little rulers here must be used in making the quilt entry....entrants must also use one of the pink bandanas Simplicity has produced in their quilt somehow, too.
 Michele is a fine fiber artist herself, so she jumped right in....
 ...and pretty much immediately invented her own unique seam treatment, which we named "Michele's Knotted Chain Stitch".
 I played around with some Simplicity trims....
 ..which was really a lot of fun, and so fast! That little ruler helped me keep things square, too.
 I got quite a few naked blocks done and ready for people to play with tomorrow...you can see where I've cut up the bandanas and pieced them into the blocks. This quilt is hopeful and cheerful, as it should be...good medicine for the fight!
 Michele and I had such a great timetogether, and we look forward to the event tomorrow. Hope you can come!
 The "blank page", 20" X 20".
 I have this luscious floral printed pink charmeuse silk that I wanted to feature...also that rich cotton print on dark blue that Tracey had given me because she knew I loved it.
 It was like fitting together a puzzle.
 I pinned everything down, but left the edges raw, not turning them under.
 Everything got stitched down with clear monofilament thread in a zig zag stitch.
 I chose some Kreinik Soie Perlee thread (alas, now discontinued) for my machine feather stitching. It is silk and about a size #12 perle, and you can stitch with it using a size #110/18 topstitching needle. I like how it looks.
 Here is where I am now after two afternoons of work.
 How's a girl supposed to get any work done around here?
 I guess I will have to give up and give in to this today!
 I started with my bag of scraps and my Go machine, with the two flower dies, the Rose of Sharon and the Round Flower.
 I noticed when she was looking at my book that Linda liked the vintage handkerchiefs pictured on page 82. So I chose one of them for the background of my piece, here shown interfaced and next to my little Go shapes.
 I used Glue Baste-It to collage my shapes into place on the handkerchief base. I was able to move them around after I had glued them too, with a slight tug to loosen them.
 Once the shapes were laid out, I covered them with tulle (a technique Linda and I had talked about), and layered this top over batting and a thin silk backing. Then I quilted it, the tulle and stitching trapping and fixing my shapes in place.
 I quilted around the rose shapes in the handkerchief too.
 I added a few more shapes, beads, and some lace trim flowers on top of the tulle. All of this is an experiment, remember...I had no idea how it would all work!
 Then I finished the edge in just the same way as for "Soil and Sky"....first zig zagging....
 ...then trimming, and then zig zagging twice more around the edge.
 The back looks kind of cool...but do kindly remember, I have had almost no practice machine quilting in over 10 years!
 And here it is finished, about 12" x 12".
 By the time I get home, I'll bet those daffodils will be popping open!


