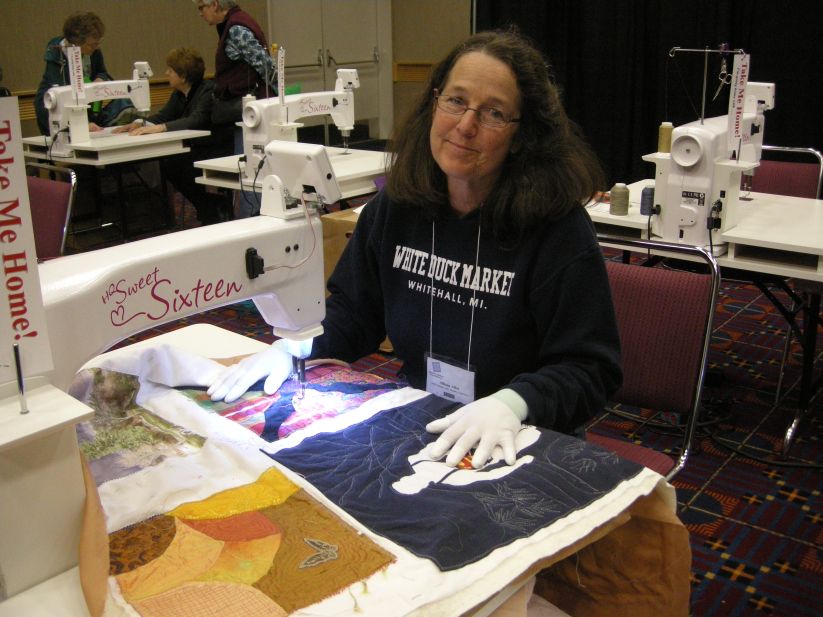
That's the HandiQuilter Sweet 16, which I have been lusting after for the past couple of years. It is basically a sitdown quilting machine with a very large flatbed surface to work on. You push the fabric around under the needle, unlike on longarm machines where you guide the movable needle over the fabric. There are no feed dogs and no presser foot. It is strictly for free motion quilting.
David Taylor is a true pro in this type of work, and is an official "Ambassador" for Handiquilter, sharing his expertise and passion for this machine.
He does detailed and meticulous pictorial hand applique, and then enhances the imagery with very close machine quilting, using hundreds of thread color changes along the way. (He likes the Sulky Blendables 30 weight cotton thread for this, by the way, because their variegations in color are random on the thread. Good tip there.)
Here is one of his quilts:
It's his dog, Maynard.
David's class was about "quilting organically". He does not mark his quilts, but intuitively responds to his imagery by quilting "the way things move and grow". I love that approach.....but as you know, I am not this kind of quilter. My agenda was to see if spending a day with a pro and the Sweet 16 would help me see if I could integrate this kind of quilting work with crazy quilting in any way. It has been an issue bugging me a lot. Can it be done?
My friend Debra Hardman is great at it, which is why I wanted her quilt in my book.
She is quite the master. I couldn't hope to quilt anything like this, but still I wanted to see what would happen, how it felt.
David started us out with a neat exercise.
He gave us some large scale floral fabric to practice on.
He also showed us how to handle a larger piece of work on the Sweet 16.
He's got the excess rolled up against the back, and has made "waves" in the quilt so that he can easily move the quilt around under the needle. He likes to quilt from forward to back (probably from years on a regular sewing machine); he starts all his quilts in the center and quilts outward from there, turning the quilt as he needs to.
He emphasized how his lines are always curved, never in a set pattern of length. He demonstrated by doing a freehand animal face.
He slowed the machine down while outlining the eyes. The Sweet 16 lets you set the speed, a great feature. But it is not a stitch regulator. David again and again stressed that the movement of your hands has to match the speed of the machine. Like in driving, how you steer and how much you hit the gas are definitely related. He also said, "You don't watch the steering wheel as you drive, either...do you?"
You are always looking ahead to where you are going to stitch, and your hands will follow your brain's lead....like in driving.
Naturally, this takes lots and lots of practice.
OK, on to my sample. The jury is definitely out for me on this! The results were crude, but held possibility...
First was my crazy quilt block.
Boo. Quilting for quilting's sake on a CQ block is a no go, for me at least. It HAS to be integrated and essential to the overall design of the piece. And that could happen, especially if the CQ was pictorial in nature. I do like the way the butterfly could move on the patch with quilting.
OK, next is the "Go Crazy" 4 block sample.
Again, boo. No likey.
Then I tried messing with May the cat.
The face is a wash. (If I dived into thread painting however, that could be cool....) I learned that there is little point in quilting on velvet. On the other hand, I kind of liked what could be done by quilting the white background doily. Potential there.
Next came the printed photo landscape. This got me excited.
David said that I was embroidering here, not quilting, and he was right. But that's what I do, so who cares? What I liked was that with practice and a deft touch, machine embroidery could work on a photo of this scale. I didn't know that before.
Finally, my biggest rush of the class. I had brought one of the running figures from Mark's quilts to see how I might quilt that. I asked David what he would do, so he sketched out some quilting lines and then I sewed over them. I was thrilled with his idea.
Click on this to see...basically, David put the runner in context, with a simple road leading with perspective to a background. I never EVER would have thought of this. In heavier thread, this would be smashing.
While I won't go this detailed on Mark's quilts, I will definitely use the concept. I had to hug David, I was so happy!
Another thing I came away with was this:
When wearing these gloves, it is very easy to move the quilt around under the needle, because you get such a nice grip. They are breathable and comfortable, light and unobtrusive. This was a major score, and will make quilting Mark's five quilts infinitely easier for me.
Do I still lust after the HandiQuilter Sweet 16? Oh indeed I do. But I can't justify the money for one yet; I can make my Juki do a lot of what I need still......but boy oh boy did I learn a lot in class, and am so glad I went.
Showing posts with label techniques: machine quilting. Show all posts
Friday, October 14, 2011
Wednesday, October 12, 2011
Mark's Quilts....Madison's
This quilt is laid out and pinned, and in the process of being hand basted. I've decided that instead of going over my basting with machine zigzag, I will leave my own stitches in place and skip the unnecessary machine step. So I'm doing a more detailed job with the basting.
These quilts will all be quite heavily machine quilted, which is something I haven't done in awhile.
In order to get up to speed, I'll be attending an all day machine quilting class with David Taylor at the Machine Quilters Exposition, which happens to be in Portland this week.
I'm excited!
We were instructed to bring a quilt sandwich to class--either a top, or just plain muslin. I have lots of different scenarios in which I might want to try new ways of machine quiltwork, so my sample looks like this:
I have an extra running figure from Mark's shirts. I'm so glad I can practice on this before going to work on the quilts! The quilt block above it will give me a chance to play with quilting on a crazy quilt block--something I have resisted for years. The printed landscape photograph will give me a chance to use quilting as thread painting over imagery, something I'm sort of intruiged by. The four block "X" is from my ongoing
"Go Crazy" project that I started last fall. And finally, May the cat on the doily is another new situation for machine quilting.
I hope to have this sample filled by the end of class on Thursday. I'll show you what happens!
These quilts will all be quite heavily machine quilted, which is something I haven't done in awhile.
In order to get up to speed, I'll be attending an all day machine quilting class with David Taylor at the Machine Quilters Exposition, which happens to be in Portland this week.
I'm excited!
We were instructed to bring a quilt sandwich to class--either a top, or just plain muslin. I have lots of different scenarios in which I might want to try new ways of machine quiltwork, so my sample looks like this:
I have an extra running figure from Mark's shirts. I'm so glad I can practice on this before going to work on the quilts! The quilt block above it will give me a chance to play with quilting on a crazy quilt block--something I have resisted for years. The printed landscape photograph will give me a chance to use quilting as thread painting over imagery, something I'm sort of intruiged by. The four block "X" is from my ongoing
"Go Crazy" project that I started last fall. And finally, May the cat on the doily is another new situation for machine quilting.
I hope to have this sample filled by the end of class on Thursday. I'll show you what happens!
Wednesday, May 25, 2011
Jill's Quilt....Finished!
With all this endless rain we've been having, I have had plenty of indoor time to do the finish work on Jill's Quilt.
I am overall quite happy with how it turned out.
First off, the center:
The stipple quilting took care of the loose wrinkly look of the silk. I used the new PolyLite thread from Sulky that I got a sample of at Quilt Market and I really, really liked it! It truly was trouble free to stitch with, not too intrusive but not "invisible" either.
But once that was done, I decided I needed a little more stipple quilting elsewhere in the quilt, to tie in with the center section. The hearts were the perfect place for that.
I used my AccuQuilt die to cut out a template to mark my quilt...in a size bigger than what I used to cut out the hearts I appliqued on.
So I marked around the hearts with the template and then stippled around that.
It shows up really well on the black background...for better or worse... ;-)
You can see how that narrow ribbon went on between all the blocks, too...and how that ties in with the trim around the perimeter of the quilt. The trim is from Simplicity, by Cynthia Rowley.
It was interesting, combining the machine quilting with crazy quilting. I could do more of this I think.
So here is the quilt, 45" X 54", finished...
I have to say, the picture here doesn't quite catch the way this quilt kind of glows. The addition of small amounts of yellow, red, and orange are responsible for that.
All the Pink Bandana quilts are going to be shown at the International Quilt Festival in Houston this coming fall. I am quite sure that each quiltmaker will be telling a moving story about breast cancer and the exhibit will be a highlight of the show. I'm honored to be a part of it.
And it is not too late for you to make your quilt. Read about the challenge here. Thank you, Simplicity, for initiating this!
......We did actually have ONE sunny day this week. (We have maybe had 10 sunny days since the beginning of Spring and I am not kidding here.) I took a picture of my home for my next project...which is to make the sample for my "Home Portraits" class at the Victorian Stitchery Retreat in Wichita in November...
Yes, the sun does come out occasionally in SW Washington!
I so look forward to teaching this class....which will be about capturing the essence of "home" in an embroidered, CQ inspired stitching project...
I am overall quite happy with how it turned out.
First off, the center:
The stipple quilting took care of the loose wrinkly look of the silk. I used the new PolyLite thread from Sulky that I got a sample of at Quilt Market and I really, really liked it! It truly was trouble free to stitch with, not too intrusive but not "invisible" either.But once that was done, I decided I needed a little more stipple quilting elsewhere in the quilt, to tie in with the center section. The hearts were the perfect place for that.
I used my AccuQuilt die to cut out a template to mark my quilt...in a size bigger than what I used to cut out the hearts I appliqued on.
So I marked around the hearts with the template and then stippled around that.
It shows up really well on the black background...for better or worse... ;-)You can see how that narrow ribbon went on between all the blocks, too...and how that ties in with the trim around the perimeter of the quilt. The trim is from Simplicity, by Cynthia Rowley.
It was interesting, combining the machine quilting with crazy quilting. I could do more of this I think.
So here is the quilt, 45" X 54", finished...
I have to say, the picture here doesn't quite catch the way this quilt kind of glows. The addition of small amounts of yellow, red, and orange are responsible for that.All the Pink Bandana quilts are going to be shown at the International Quilt Festival in Houston this coming fall. I am quite sure that each quiltmaker will be telling a moving story about breast cancer and the exhibit will be a highlight of the show. I'm honored to be a part of it.
And it is not too late for you to make your quilt. Read about the challenge here. Thank you, Simplicity, for initiating this!
......We did actually have ONE sunny day this week. (We have maybe had 10 sunny days since the beginning of Spring and I am not kidding here.) I took a picture of my home for my next project...which is to make the sample for my "Home Portraits" class at the Victorian Stitchery Retreat in Wichita in November...
Yes, the sun does come out occasionally in SW Washington!I so look forward to teaching this class....which will be about capturing the essence of "home" in an embroidered, CQ inspired stitching project...
Labels:
a
,
projects: Jill's Quilt
,
techniques: machine quilting
Monday, May 23, 2011
Quilting Jill's Quilt
I've never believed that crazy quilts should be quilted.
To me the two surfaces--quilted and embellished--are almost mutually exclusive.
But lately I've been interested in hybrids....not cars...but quilts, that are both crazy and sane. Jill's Quilt is an example of this. Structurally, it needs to be quilted. And because the embellishments are graphic but not detailed, some sewing amidst them was theoretically possible.
That big blank space in the center of the quilt, around the lettering, actually needs the quilting from a design standpoint, too.
So I decided to give this a try.
First I pin basted it, one safety pin per 6" block.
I used drapery lining for the batting (not EVER wanting puffiness on a CQ) and some nice gingham from Kaufman Fabrics on the back. The blue and white check will hide the quilting lines, which are not of interest, IMHO.
My Juki is threaded with clear monofilament on the top and some nice and substantial Aurofil #28 in the bobbin. I'm using a largish topstitching needle and all worked just fine.
Alas, the Dodgers were losing...again! *sigh*
After getting all the in-the-ditch work finished between the blocks, it became immediately apparent that I had to add some quilting within them too. You do have to give a quilt what it wants....can't hold back.
I kept in the ditch, but around the main elements in the blocks (free machine stitching here).
And I switched to 1949's "Little Women". Liz Taylor as Amy, Janet Leigh as Meg, and Margaret
O'Brien as Beth. Excellent! The costumes were superb as well.
Quilting in the ditch between the stitches was a little tricky, but doable. It wouldn't have been if there were beads involved, though. As it was, I was able to avoid all the hand stitches.
When all that was done, I realized that the seams between the blocks had to be covered. The quilt just didn't look "done" with those bare seams. Hybrid or not, this is still a crazy quilt!
I got a bunch of this narrow Renaissance Ribbon on sale at Fabric Depot. Using a clear zigzag on top and some Wonderfil Invisifil thread in the bobbin (I really didnt want it to show on the back more than necessary) it is quick work to sew this down.
It was simple to bury the end of the ribbon into the quilt before sewing the ribbon down.
Easy peasy.
And now to the center. I've quilted around the letters but do need to knock back that puffiness in the green silk.
I'll probably weanie out and just stipple quilt it...I don't have enough practice at fancy machine quilting details to pull off anything else. But I think it will look ok.
Then to finish the edges, put on the sleeve and label, and this is done!
To me the two surfaces--quilted and embellished--are almost mutually exclusive.
But lately I've been interested in hybrids....not cars...but quilts, that are both crazy and sane. Jill's Quilt is an example of this. Structurally, it needs to be quilted. And because the embellishments are graphic but not detailed, some sewing amidst them was theoretically possible.
That big blank space in the center of the quilt, around the lettering, actually needs the quilting from a design standpoint, too.
So I decided to give this a try.
First I pin basted it, one safety pin per 6" block.I used drapery lining for the batting (not EVER wanting puffiness on a CQ) and some nice gingham from Kaufman Fabrics on the back. The blue and white check will hide the quilting lines, which are not of interest, IMHO.
My Juki is threaded with clear monofilament on the top and some nice and substantial Aurofil #28 in the bobbin. I'm using a largish topstitching needle and all worked just fine.Alas, the Dodgers were losing...again! *sigh*
After getting all the in-the-ditch work finished between the blocks, it became immediately apparent that I had to add some quilting within them too. You do have to give a quilt what it wants....can't hold back.
I kept in the ditch, but around the main elements in the blocks (free machine stitching here).
And I switched to 1949's "Little Women". Liz Taylor as Amy, Janet Leigh as Meg, and MargaretO'Brien as Beth. Excellent! The costumes were superb as well.
Quilting in the ditch between the stitches was a little tricky, but doable. It wouldn't have been if there were beads involved, though. As it was, I was able to avoid all the hand stitches.
When all that was done, I realized that the seams between the blocks had to be covered. The quilt just didn't look "done" with those bare seams. Hybrid or not, this is still a crazy quilt!I got a bunch of this narrow Renaissance Ribbon on sale at Fabric Depot. Using a clear zigzag on top and some Wonderfil Invisifil thread in the bobbin (I really didnt want it to show on the back more than necessary) it is quick work to sew this down.
It was simple to bury the end of the ribbon into the quilt before sewing the ribbon down.
Easy peasy.
And now to the center. I've quilted around the letters but do need to knock back that puffiness in the green silk.I'll probably weanie out and just stipple quilt it...I don't have enough practice at fancy machine quilting details to pull off anything else. But I think it will look ok.
Then to finish the edges, put on the sleeve and label, and this is done!
Subscribe to:
Posts
(
Atom
)