Saturday, July 21, 2018

"Nan", My Latest "Frame it With Flowers" Project

"Nan" 
I'll be teaching the embellishment class, "Frame it With Flowers" twice in the next 8 months. (See the My Teaching Schedule tab, above.)  This has given me wonderful motivation to create a new piece, to be used as my current class sample.

Nan...that was the name my mother's closest friends and relatives gave her. The picture above was taken a few years before she died in 1976, and is my very favorite of her.  Framing this image has been such a joy--I've gotten to look into those eyes  all the while I stitched!

All the techniques here will be covered in class. 

Below are some more Framed loved ones created in past years...

"May"
 It all started with our cat May in 2010.

"Allers, 1961" 
A similar piece commemorates my husband's family.  It cracks me up how "engulfed" his dad looks!

"Abe and Faye"
My sister-in-law asked me to make this commemorating her parents' long marriage.  This was taken right after Abe got home from Europe in WWII.  Pure happiness!

"Elle, Dave, and the Girls"
This picture was taken a few months before my niece and nephew-in-law's twins were born.

 "Pete and Katie"
To celebrate my nephew's engagement. ;-)

"Tammy"
      My wonderful neighbor who loves her garden.

"Max and Esther"
This was taken in the courthouse moments after they were officially pronounced man and wife by the absolutely sweetest judge.  I love everything about this picture, especially their wedding clothes!
I've used this format for two of the three dedication pages of my books, too.
 This is from Allie Aller's Crazy Quilting, C & T Publishing, 2011.  Again, it is my mom--she would have been so proud of me to publish a book!  This was her senior college portrait; you can't see the jeans and saddle shoes she was also wearing.  ;-)

"Man of My Dreams"
This is the Dedication page of Stained Glass Quilts Reimagined, C & T Publishers, 2017.
It just struck me as funny and so us, that I would choose this picture of my husband, Robert, to frame and honor in my book.
Every Frame it With Flowers project is different, and each student's take is such a joy for me to see.
       I hope you will try this sometime....

*****************************************

My mom taught me gardening, and to frame my life with flowers.....


Thursday, July 12, 2018

Blog Hop for Lynn Krawczyk's The Hand-Stitched Surface


Lynn Krawczyk  of Smudged Design Studio is an artist who loves to explore and think outside of the box with her stitching. Her playfulness is infectious!  When she asked me to join this blog hop and spend time with her book, The Hand-Stitched Surface, I was eager to come play.

Truly, how enticing is that cover? So much mixed media goodness is going on with that needle and thread.

But before I dive into my own engagement with one of the chapters, Lynn asked me and the others on this week long hop to each give one of our best stitching tips.
Do check out the other ones presented!  They are fantastic!


Monday July 9 – Lisa Chin

Tuesday July 10 – Ana Sumner
Wednesday July 11 -- Lyric Montgomery Kinard

Thursday July 12 – Libby Williamson

Friday--ME!!

Saturday July 14 – Lynn Krawczyk
***********************************************************************************
I learned my tip from the very great stitcher, Lisa Caryl.
Using these simple round plastic canvas shapes, available at any crafts store or here on Amazon, you can easily mark whatever sized circle you need on your embroidery. 

It is easy to mark dots around the circumference size you need with a water soluble marker.......and then use the marked dots as your guide for stitching a perfect stitched circle.


 After you have finished stitching, a quick spray with a water bottle and the marks are gone, leaving your perfect circle of stitching.


I will always be grateful to Lisa for this tip!


*****************************************************************************************


 Now, back to the fantastic pages of The Hand-Stitched Surface.  

The book is divided into three sections: Stitching Techniques, which are very helpful with clear examples of many stitches and how to make them, Fabric Projects, and Paper Projects.


It was the paper stitching that intrigued me.  Rather than make a project--though the ones Lynn presents are really cool; I especially loved the Embellished Photos--I studied her excellent pointers on how to work with needle, thread, and paper, and then launched off on my own.


I decided that adding stitching to a handmade greeting card would make it extra special.  So I started with a Thank You card.


 This began with a background collage of cut out floral images from a catalog.  Then I cut out the anemone and moth out of fabric, glue-sticked them onto my background, and then handstitched them on with a buttonhole stitch in #12 thread.

The lettering is done with a whipped backstitch. (Thank you, Mary Corbet for the YouTube how-to in that link!)

This card was definitely out of the box for me.


For my next card, I decided to print an image onto cardstock, again a thank you image, one I had created several years ago.  I wanted to see what added stitching to it would look like.


What I found fascinating about this was the design element provided by the holes in the paper.  The way I photographed it, you can see the light shining through them.  Very different!

For my last experiment, I decided to try and obscure the holes with beads.  As Lynn would say, "Why not?"  Her freedom to see what happens is one of my favorite things about her book.  It is liberating.

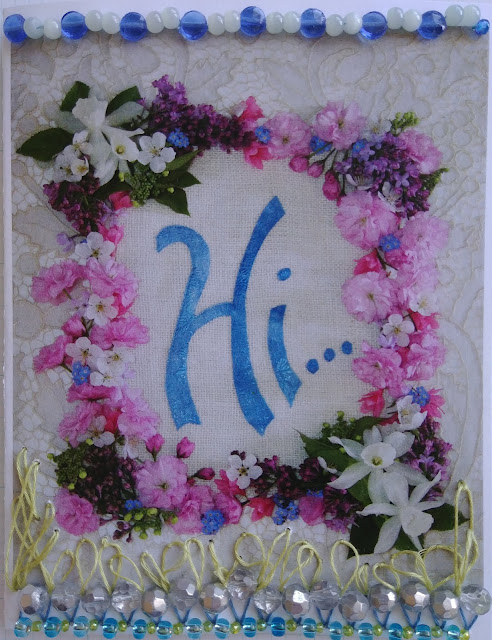
Below is another image I made years ago, using the same process as the "Thanks" card above...by appliqueing the lettering onto a background fabric, arranging fresh flowers around them, and then photographing it. The photo can then be printed on fabric or paper.

When working with paper, it is good to pierce your holes before stitching, as they are permanent.  You want to place them as accurately as you can.  For my second card, I used my sewing machine and an unthreaded needle to make my holes, ensuring even spacing.


Because the paper stock was heavy, the holes could have several passes of thread go through them.


And here it is, finished.


This was so much fun! I love the unexpected three-dimensionality of stitching and beading on paper.
******************************************************************************
 Lynn opened some new doors for me and her book will for you too.  U.S. readers, leave a comment here for a chance to win a copy for yourself. On Tuesday, July 17th I'll pick a comment at random, and then post the winner.  So do check back!  Each of the bloghop posts is giving away a free book too, so comment on them all!

Thank you so much, Lynn!


*********EDIT*******
We have a winner!  Quilter Beth!
Thank you all for visiting and commenting!
*****************************