Tuesday, March 30, 2010

Block Surgeries...and 16" Sampler Finished!

Before I could complete my 16" Sampler, it needed to go "under the knife"...and also have some cosmetic surgery as well.

That yellow patch in the upper right block....it just didn't flow right. So out with the seam ripper!

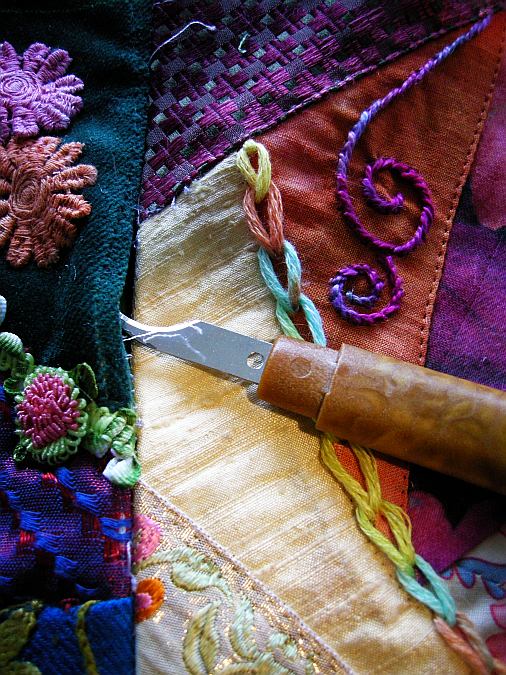
I very carefully opened up the seams during this operation....

....fit in my new patch, two sides of which were ironed under and the other two sides tucked behind their neighbors' edges...

...eh voila! Much better.

The other little problem was just a long yellow sliver caused by the piecing that didn't look right. Sorry, I didn't get a "before" picture of that, but I can show you the "fix"...

Along the horizontal seam where the two blocks are sewn together...see that long brownish triangle? That used to be yellow. It is in fact part of the same piece of fabric as the mottled yellow on the left. But I colored that triangular shape in with a marker, quilted along the colored edge with clear thread, and then embroidered over it as if it was a seam. Problem solved!
This just keeps that nice curve from being broken up.

Here's the whole thing, all done (except putting on the backing.)

"Click to embiggen, " as Marty would say.

Oh, this was so fun!

Sunday, March 28, 2010

16" Sampler


I like this size for a quick romp in my crazy quilting world. This piece grew alongside the Granddaughters' Flower Garden project...just a different take altogether on what you can do in a 16" X 16" square.
The lace motifs are from Nikki Lee's Etsy shop. She sure puts color on lace in a beguiling way.

I just wanted to play..... ;-) It's not done yet but it's close. Big stitches and lots of trim speed things up, too...

Thursday, March 25, 2010

"Granddaughters' Flower Garden"...Finished!

What fun this was, creating a most nostalgic contribution to the Alliance for American Quilts' "New from Old" fundraising quilt contest.

My cousin Tracy's painting of our grandmother's housewas a joy to work with, but it presented some challenges, too.
The heavy brown vertical lines in the house needed to be integrated with those pastel 1930's Grandmother's Flower Garden blocks I was dying to use. So there was a balancing act involved, employing value, line, repetition, and a large dose of whimsy to bring it all together.

Here's a detail to show how I finished the "frame" around the central image. That 4mm silk ribbon that is blanket-stitched in place was hand-dyed by Pat Winter. Her ribbon is always "just the thing" I need. Thanks again, Pat!

So have a look at the completed quilt....

I added a little machine quilting to the center....nothing obtrusive, just enough to keep the surface secured.
I'm quite happy with the concept and execution, though I would love to have another go at it sometime...

I do hope you will consider entering a 16" X 16" quilt of your own. Mine is not eligible for the contest, as I am currently serving on the board of the Alliance....and I am so happy to support their fundraiser with this quilt (all the contest quilts will be put up for bid on Ebay in the fall of 2010.)
...but YOU all could win some really substantial prizes, including a $5000 "sit down" model Handi-Quilter machine.
Also, the quilts will be hung at American Quilter Society, the National Quilting Association, and International Quilt Festival shows this year, getting quite a bit of attention!
So get your work out there, compete for some valuable prizes, and support a cause dear to all of us quilters. What does "New from Old" mean to you?....

Monday, March 22, 2010

"Granddaughters' Flower Garden"...Painting Flowers

I didn't want my flowers to compete too much with the Grandmother's Flower Garden blocks in the border. More like they were "growing from the same soil"...

...so I kept to the same 1930's color palette.
I used a diluted Tsukineko ink to get the color on them.

Once they dried, I've been playing with their arrangement on the quilt.

Click on the photo to get a better view. I've placed the brown silk ribbon around the quilt to give myself a visual on how it will look bound.
These flowers are still pretty subtle looking, blending in perhaps too much.
But we can fix that....!

I usually don't have trouble parting with my fund-raising quilts (this is for the Alliance for American Quilts), but this one might be a little harder to send off....

Wednesday, March 17, 2010

"Granddaughters' Flower Garden"

"New from Old", the theme for this year's Alliance for American Quilts contest, lends itself to so many interesting interpretations.
Three of my fellow bloggers are already at work on their entries, and you can see them here:

--Barbara Curiel's embellished Madonna on a vintage textile is already so beautiful.

--Amy Munson is again beading a wonderful piece (her "Crazy for Beads" won an Honorable Mention last year and is featured in the April/May 2010 issue of Quilter's Newsletter Magazine)

--Gerry Kreuger is creating a fascinating piece linking her grandmother and her granddaughter.
At the bottom of the link given to Gerry's blog here are links to her other posts about her contest entry.

If there are more of you participating in "New from Old" and blogging about it, do please let me know!

The connection between my cousin Tracy and me to our mutual grandmother has formed the basis of my own contest piece. I am combining some 1930's "Grandmother's Flower Garden" blocks with a beautiful watercolor sketch that Tracy made especially for this quilt. It is her rendition of our grandma's house, a place we met every Sunday for family get-togethers when we were children.

Here is her painting transferred to EQ printable cotton lawn and I am squaring it up.

I've learned that transferred images just mysteriously will stretch or distort while I work with them. So immediately I interface them now.

I've also learned that having images like this in the center of a quilt requires that they have a little extra batting behind them. I really don't know why. At this point I just add the batting before I even sew the transferred fabric image onto my quilt.

Placing the batting inside of the folded under seams means they won't show through the image on the front, too.

In this picture I am just laying out the background fabrics beneath the hexagonal border blocks. The printed image will go on after the background is sewn down with a machine zigzag in clear thread.

To sew on the border blocks, I decided a nice machine buttonhole stitch would do the trick. Plus, I wanted to try out the new 30/wt. Aurofil cotton thread I just got to see how it would do in this application.
Well, it is WONDERFUL thread, substantial but not too heavy, smooth and yummy with no lint. I'm a convert! In the above picture I was figuring out which size stitch to use. Once I did, I sewed down all those blocks.

Fast forward.....

A granddaughter's flower garden would not be complete without a whole bunch of embellished flowers, now, would it?
I don't know how much these border blocks are even going to show by the time this is finished; I expect there will be many, many blooms all over them. Lots of "gardening" is ahead for me from here....

Tuesday, March 16, 2010

TAST Week 2 "Knotted Loop Stitch"

I'm using this year's TAST as a means to get some new stitches along the seams of my Vintage CQ. Otherwise I would simply default to my old favorites: Herringbone, Cretan, Feather, etc. when covering the seams of these blocks.

This week's "Knotted Loop Stitch" took me awhile to figure out, but once I did, it was fun. I like the way it gives a slightly raised look to the simple seam treatments.

The knotted loop stitch is along the brocade orange fabric, lower right. Using heavy round thread helped me see what I was doing with the stitch.

In the second example I definitely had the rhythm going but did get my knots reversed here and there.

I am becoming more and more interested in the graphic impact of seam treatments, as opposed to the intricacies of their embroidery...I leave that to more capable stitchers!
For visual impact, this stitch has great potential, and I am glad I finally "got it"!

Sunday, March 14, 2010

Even More Needlepunch Ribbon Flowers

I have made several more of these ribbon flower pins since the last time I posted about them.

Experimenting with different ribbon widths, adding other fibers, including different beads...creating these has been an ongoing quest.
And I finally figured out a way to "finish" them that I like!

They make nice gifts....

This one uses 13mm and 4mm RiverSilks ribbons, Krenik Soie Noppe thread and 6 ply silk floss, with some barely visible machine sewing thread in little loops in the center.

It became this:

The leaves are made from the hand-dyed felted wool I bought from Vicki Day in January.
This pin is a bit large for my taste, though. So I went smaller.

This one has simpler leaves and is smaller in diameter too. There are more beads incorporated as well. You can sew those on either after needlepunching the ribbon or before.

Next I tried sewing the leaves around the perimeter of the ribbon flower itself.

I like it, but they are a wee bit hard to see. Too subtle, I guess.

Larger leaves again, then.....

But they are nice and clean looking, of vintage lucite.

All these flowers were mounted over Timtex with an additional covered Timtex backing which worked well but felt cumbersome to me.
Then it finally occurred to me that covered button blanks could be ideal for this application. They come in sizes that are plenty big. So yesterday I tried that approach.

The button blank is 1 1/2". I've got a circle slightly larger than that drawn on my fabric in the hoop, to account for the curvature of the button blank. You can see my pearls are already sewn into place.

Fast forward to fitting the finished punched flower over the button form. I've removed that wire shank.

Using strong Silamead thread, I ran a gathering stitch around the trimmed perimeter of my punched fabric.

Then I cinched the gathers tightly, and took a few more stitches to get everything snug.
This picture doesn't show it, but next I used my fingers to push the fabric onto the prongs in the button form. That way it is easier to snap the button back over it into place.

And here is the lavender flower....

The leaves are a size I like, and the flower is held together quite securely and neatly by the covered button front and back. I just need to glue a pinback on it and it is all set to go on a lapel somewhere!

I'll be teaching how to make these flower pins at a private class arranged by a friend of mine in the Bay Area in May, and also at the Adventure in Crazy Quilting conference in Connecticut in April 2011.
This Adventure, produced by Maureen Greeson and Susan Elliot, with my co-teachers Betty Pillsbury and Sharon Boggon, promises to be a truly wonderful event for crazy quilters from around the country. Hope you can attend!

Friday, March 12, 2010

"New from Old"...A Warm-Up Study

While I am still waiting for the wonderful image to arrive that will be the central focus of my "New from Old" contest entry to benefit The Alliance for American Quilts, I decided to do a small study incorporating some of the elements I will be using.

Vintage quilt blocks are showing up in my work these days, as in the portraits I've done recently of my nieces Elle and Amaleah.

This is Amaleah....it was my Point Bonita project. This measures 17 1/2" X 17 1/2".

For my "New from Old" quilt I have some lovely 1930's Grandmother's Flower Garden blocks that I want to incorporate, so I spent the last few days playing with them.
Plus, as always happens, I got totally distracted by the new flowers opening up in the yard, even in the midst of all this cold rain! I had to add them, too.

So I laid out some blocks and flowers together on a gold silk dupioni background and took their picture.

The idea was to print this image on fabric and then embellish it.

And this is what I did. I love using the EQ Printables prepared fabric sheets. They give the sharpest print!

However, even after I had already started embellishing this, I decided I didn't like the way the gold background looked.

So off it came. I had already interfaced my print here with fusible knit interfacing to keep everything nice and stable.
I decided on a rich purple/blue background instead.

I put the purple silk on a muslin foundation with my ink jet print appliqued by machine over it. Notice I am using a very fine needle here, the size 60 Microtex Sharp. This is to leave as small a hole in the printed EQ fabric as possible, because holes unfortunately are permanent. Using clear monofilament thread in a narrow zigzag with this fine needle worked very nicely.

Then just for the fun of it I added a little trapunto to the back of the pieced star that is printed in the center of the design.

This is about 8 1/2" X 8 1/2".
I'm just getting in gear with the embellishments here. Those little four-petaled orange flowers with the beads in their centers are from cut-out painted Tyvek. Easier than Angelina!

Because this little project is for a friend of mine, I put her initial in the center.


All in all, this was a fun little exersize, familiarizing myself with the elements I'll be working with in the 16" X 16" New from Old quilt. I'll be using the actual Grandmother's Flower Garden blocks in that one, though.
I can't wait until my cousin Tracy's watercolor sketch arrives for the central image and I can get started!

Tuesday, March 9, 2010

Vintage CQ...Beginning the Block Embroidery

With all the traveling I've been doing I am so glad I've had these portable blocks to work on while flying and spending time on the road.

These are early days...the blocks still look and feel pretty "naked". I have just been "working the stack", as Martha Green would say, pulling out a block, adding a seam treatment, then pulling out the next block, etc.
Now that I am home, though, I can put them all up on the design wall to monitor how the seam treatments are working graphically and as a whole.

I did decide to go more traditional with them...no beads, nothing too flashy. I want the central flowers to remain the stars of this particular show.

As always, "click to embiggen", as Marty would say.
Notice that very fine black line pinned into place between the blocks and the central section? My friends at Point Bonita insisted that be there, and I believe they were correct. Makes a big difference.


Here's a closer look at the beginnings of my seam treatments.
Of course, on those old crazy quilt fragments I pieced in there, the stitching was already done!

I'm waiting on a special item to arrive before I dive into my "New from Old" entry for the Alliance for American Quilts. That is going to be so much fun to create, and I'll be blogging the entire process...til, then, I'll keep with my blocks here...

TAST Week 1 "Diamond Stitch"

...This really should be titled, "Flunking the Diamond Stitch".

I've decided that my TAST stitching (that's the "Take a Stitch Tuesday" challenge that Sharon Boggon is running) is all going to go onto my Vintage CQ project. It's the only way I'll get to spend the time, if I double task these things.
The Diamond Stitch did not seem like a great fit for this application, though--too many knots that wouldn't show up that well. Plus it was just not easy for me to "get it"!

I went for the look of it, kind of...

The light blue Aurofil wool/acrylic thread there is my version of the Diamond Stitch. Rather pathetic!

But I am excited about Week 2's stitch, the Knotted Loop Stitch. I know that one will go better for me because it is not as complicated and much more graphic...

Tuesday, March 2, 2010

Fun Around Monterey Bay...

The PVQA show was a ton of fun. There were some great quilts in the guild show--you'll see a few of them below--wonderful people, and my lecture and show were warmly received.

I have to admit, watching people respond to my work was pretty gratifying.

My hostess Tracey Brookshier took such good care of me throughout the long week-end, even taking me on a field trip yesterday to the Asilomar Conference Grounds (home of the Empty Spools Conference) and the Monterey Bay Aquarium.

Tracey also organized the Third Annual Transatlantic Challenge, which included 42 quilts from the UK and the USA interpreting the theme, "Go Green". Here are some of my favorites:

A soft and freeform artquilt by Shauna Moulton...

Judy Mathieson honored her son's organic vegetable farm...

Helen Clark's "Green Man"...

Holly Casey's passionate plea...

...and my favorite, by Rosemary Eichorn...

Do click on this. The glory is in the details....I asked her if it was abstract or representational and she said, "Yes...." She was a most lovely person and I would study with her in a heartbeat. Here is a detail of her quilt, taken with a flash for the sake of better focus:

She is a collage fiber artist with a deft and ethereal touch...after seeing this quilt I went online and bought her book that same day. We use the same supplies, but in such different ways...

For my friends in Britain, here are the Go Green show dates this coming summer and fall for you to see these quilts:
18 - 20 June Sandown nr London National Quilt Championships
3 - 5 Sept Harrogate, Yorkshire Great Northern Quilt Show
24 - 26 Sept Edinburgh Scottish Quilt Championships
29 - 31 Oct Malvern, Worcestershire Malvern Autumn Quilt Festival
5 -7 Nov Chilford, Kent Chilford Autumn Quilt Festival


Also at the quilt show in the block challenge, one of my Point Bonita students had her project from my class on display.

In this portrait of her grandparents, Nancy Goudarzi has taken the floral embellishment techniques she learned and made them truly her own. That gives this teacher a thrill!

There was a vintage crazy quilt on display from the estate of Don Gibson, purchased in Santa Cruz, California.

I loved the bar setting (between strips of wide woven ribbon) and controlled palette of this old crazy.

Here's a closer look at some of the stitching. Wouldn't it be great to have the time to make a quilt using this format?

Tracey strongly encouraged me to stay an extra day so I could visit Asilomar and the Monterey Aquarium, and I am so glad I did.

The Craftsman era architecture of the center is so inspiring. Here is Tracey standing by the space allocated to Empty Spool's Resident Artist for the week, Kerby Smith, or as he calls himself, "Mr. Lura Schwarz Smith". ;-) Those are his quilts up on the stage, too.
Empty Spools would be the place to seriously increase your quilting skills during a 5-day in depth seminar. The classrooms we peeked in on were quiet and very focused.
And what a setting! I hear the food is quite good, too...

The Monterey Aquarium was filled with the most unbelievable Creations of all. The ones that really got to me were the jellyfish...

I mean, really....

The mind just staggers....

So it was a stimulating trip through lovely landscapes and friendships and some new professional terrain as well. And while I was away, the daffodils popped.

The Yellow of Spring is here on the hill at last....

I'm off again to visit some relatives this coming week-end back in Ohio. Then I plan on staying put for a nice long while!